How to Build in Obby Builder
Parts, traps, lighting, movers, and a course people actually finish.
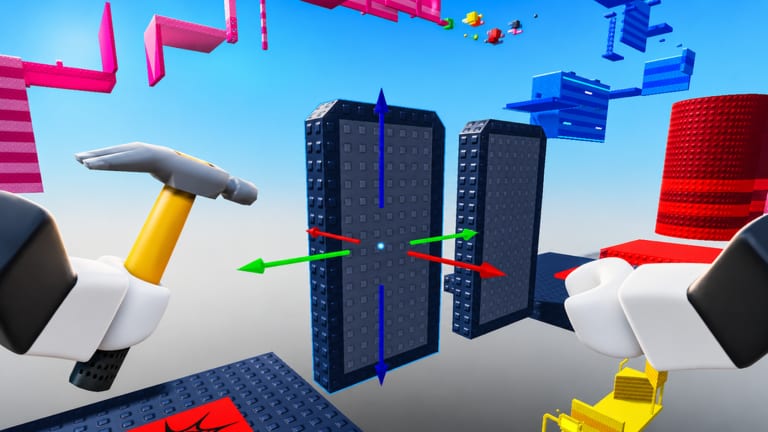
Building in Obby Builder is a loop: place, nudge with gizmos, playtest, then save a slot. The hammer and part picker are the whole studio. Official screenshots show a first-person hammer and RGB axis arrows on the selected part. Red, green, and blue match the Move gizmo you will see in the world. If the arrows feel invisible, rotate the camera until one axis faces you, then drag that arrow only.
This page assumes you already have a spawn and one checkpoint from Getting Started. If two people will edit, read Co-op Building before you both place killbricks on the same landing.
Hammer, gizmos, and the first layout
Enter build mode and keep the hammer out while you work. Select a part, then use the Move gizmo instead of shoving with your avatar. Nudge in one axis at a time. Tiny gaps that look fine in first person eat mobile runners. Snap platforms so edges line up; a one-stud lip at a corner is a silent fail.
Start with a spine: spawn, three to five platforms, checkpoint, three to five platforms, finish. Color can wait unless contrast is the puzzle. Rainbow Parts (99 Robux) is optional chrome. It does not fix spacing.
Scale is a trap. Taller, Longer, and Wider Obby (199 Robux each) add volume. They do not add a route. Fill new space with landings and checkpoints, not air. If you are still blocking the spine, leave extra height unused.
Delete as often as you place. A floating decoration that sits in the jump arc is a trap even if it is not a killbrick. Signs belong beside the path, not in it.
Parts that help versus parts that punish
Platforms are the default floor. They should be wide enough for an R6 hitbox plus a little thumb error. Killbricks punish a miss. Use them as a border or a clearly marked hazard, not as the only floor color in a jump. If a killbrick and a safe pad share a hue, recolor one of them. The parts tier list ranks common pieces by how often they ruin a fair run.
Truss-style parts are for climbs. Place them so the avatar can grab without sliding off a killbrick at the base. Do not hide a truss behind a moving killbrick on a first course.
Buttons gate a door, a bridge, or a mover. Put the button on a safe pad and make the result visible from that pad. Runners should see the door open. If the button is a timing puzzle, add a checkpoint before it.
Signs carry the title, a hint, or a warning. One sign at spawn with the course name is enough for discovery. A second sign before a one-way mover that says the mover does not reverse saves retries.
Teleporters skip scenery. Use them to return a failed runner to a checkpoint island, not to hide the only path. A teleporter with no visible destination feels like a void kill.
Music is optional atmosphere. Keep it quiet enough that jump timing still works on mobile speakers. If the track fights the pace, turn it down before you add more drums.
Checkpoints, gadgets, lighting, and movers
Checkpoints are the difference between a like and a leave. Place one after every hard idea, not only at the end. A five-minute course with a single checkpoint is a highlight-reel for you and a refund for everyone else.
One-way movers are conveyors, platforms, or gates that do not let you walk back. Treat them as a commit. Put a checkpoint on the far side, or do not use the mover. If the mover dumps into killbricks, the run is over and the like is gone.
Advanced lighting sells a mood: night runs, neon killbricks, contrast on tiny pads. Light the landings first. A dark jump with a bright deco wall is how people miss the floor. Test lighting on both PC and a phone; bloom that looks cinematic on a monitor can hide edges on a tablet.
Emotes are for the lobby, not the spine.
While the layout is ugly, mark the slot Unlisted. Unlisted keeps random Trending traffic off a half-built floor. Turn Unlisted off when you want likes. Drafting listed is how empty plots collect zero likes and a few confused deaths.
Draft Unlisted, then playtest
Playtest in play mode without assuming you remember every jump. Start from spawn. If you own Fusion Coil (149), Gravity Coil (79), or Speed Coil (79), unequip them for the fairness test. Coils are for checking a long gap you intend to keep as a coil skip, or for traversing your own plot while you edit. They are not a substitute for a beatable default jump.
Walk the route once as a runner who has never seen it. Then invite one friend. If you build with that friend, split jobs: one person owns layout, the other owns traps and lighting. Co-op fights happen when both people Move the same checkpoint.
Before you chase Trending, run the build checklist. After that, read Get Featured for likes, Unlisted, and Highlighted.
Save after every successful playtest. Copy the slot code again. If a later edit wrecks the spine, Restore Data beats rebuilding from memory.
Frequently Asked Questions
Quick answers to the most common Obby Builder questions.
What are the RGB arrows on a selected part?
The Move gizmo. Official art shows red, green, and blue axis arrows. Drag one axis at a time instead of pushing parts with your avatar.
Should I use killbricks as the main floor?
No. Keep platforms as the path and killbricks as marked hazards. See the parts tier list before you spam red floors.
When do I turn Unlisted off?
After a playtest without coils and after the build checklist. Unlisted is for drafts, not for a course you want on Trending.
Where do one-way movers belong?
After a checkpoint, with another checkpoint on the far side. A one-way dump into killbricks is how runners leave.
Can friends place parts with me?
Yes, on the same 10-player server. Split layout versus traps first; the co-op guide covers ownership and Restore Data.
Does a bigger plot get more likes?
Not by itself. Fair spacing and checkpoints convert better than empty volume. Chase visibility on Get Featured.